Blog

In today’s world of cloud-based solutions, distributed systems, and microservices-based architectures, network communication is a fundamental part of our applications. The HTTP protocol became the primary way of transferring data, both externally and internally, replacing the monolithic applications’ in-process (in-memory) communication. HTTP(S) is now being utilized everywhere, both within our own services (often via gRPC, which is based on HTTP) and externally, when users reach our services, or when we ourselves reach some 3rd parties.
The Hypertext Transfer Protocol became something that we as developers take for granted, mostly thanks to libraries that simplify the process of sending a request and receiving a response down to a few lines of code. However, the process involved in actually sending out the HTTP request to the network is quite convoluted – many more protocols are involved.
In this blog post, we’re going to go down that road to uncover some of the parts of that process. We’re not going to wander too deep down the networking layers, certainly, we will not see any electrical signals or even bits of packets. We’ll remain on the comfortable level of abstractions created by the higher-level protocols, such as TCP. That level is often enough to debug and understand typical problems in network communication.
The scenario that we will be going through is simple. We’ll discuss the steps involved in an HTTP request, and we will try to extract the most interesting events in the timeline of such a request. We will not look in detail at the HTTP request itself, but rather at the steps that HTTP builds on top of.
Assumptions
In the analysis that we’ll go through, we need to assume some preconditions:
- The machine being used for the hypothetical HTTP request invokes that request for the first time ever, so no caches come into play.
- An HTTP request could be invoked in many ways (e.g. from code, or using some GUI/CLI tools), we will assume that we’re using a web browser. This way we will not need to adhere to any conventions imposed by a specific library/tool.
- HTTP/2 is being utilized (no QUIC, but good old TCP).
HTTP Request
Just like we said in the Assumptions section, we’re going to send a request by typing an address into the browser’s address bar.

Even though we intend to send an HTTP(S) request, there is a long way before that will happen. Let’s have a look at the most important steps involved in this procedure.
DNS
When we press RETURN, the first notable thing that’s going to happen is the DNS query. Well, technically, the first thing would be the ARP request to resolve the MAC address of the local router, but we are going to skip that in this analysis.
esky.com is a domain name, which is useful for us humans, but to send the TCP/IP request, we need an IP address of the destination server (or, more realistically, its load balancer). Depending on our operating system and its configuration, the DNS query might be resolved in different ways. For example, Linux distributions would inspect the contents of the /etc/nsswitch.conf file to find out about the sources of DNS entries. On typical systems, It would be the `/etc/hosts` file (or C:\Windows\system32\drivers\etc\hosts on Windows), and some external DNS service. The DNS service’s whereabouts could be provided by DHCP in the form of an IP address of said service – a domain name for a DNS service would not be very helpful, since we would have to resolve it to an IP somehow. In our scenario, to resolve the IP address of esky.com, we’d reach out to some external DNS service, since you probably do not have the IP stored in /etc/hosts.
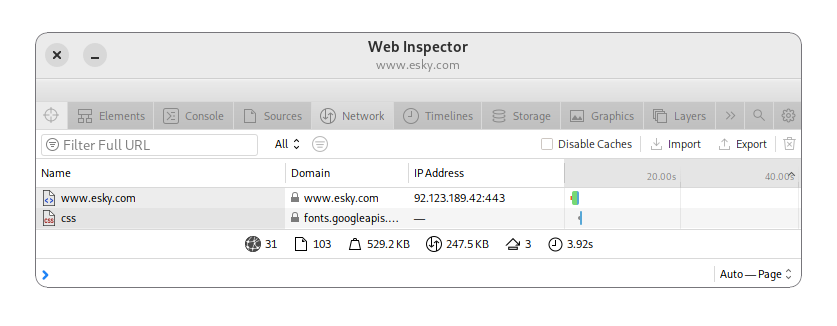
To see the IP address of the server that the browser is sending a request to, you can open your browser’s Dev Tools and choose the Network tab. One of the available columns should be the “IP Address”/”Remote Address” or something similar.

As a side note, DNS is the weak point in the privacy area of the whole process. The domain that you’re trying to access is visible to others unless you are using DoH or DoT.
HSTS
Having the IP address, we could potentially go ahead and start the actual TCP connection. However, modern browsers apply the HSTS (HTTP Strict Transport Security) policy first. In short, we want to mitigate the man-in-the-middle attacks by always using TLS in our HTTP requests – turning them into HTTPS in the process. HSTS defines a specific header that the web server should return to web browsers in order for this server to be remembered as HTTPS-only. Since we assumed that our caches are empty and the request has been invoked for the first time ever on our theoretical machine, HSTS is not going to play a role in this case. However, it is worth knowing that such a mechanism exists.
Modern browsers actually come with predefined lists of domains that should be communicated only via HTTPS. Such a list can be found here: https://source.chromium.org. Interestingly, even though the linked resource is a part of Chromium source code, this list is being used not only by Chromium-based browsers but also by others, like Firefox. This approach is not scalable, but it helps to secure the first connection with a given server, ensuring that HTTPS will be used upfront, even if the user does not explicitly specify that.
As a side note, web browsers might apply some additional security policies while you’re browsing the Internet. Google’s Safe Browsing initiative (https://safebrowsing.google.com) is an example of that.
TCP
HTTP up to version 2 has been based on the TCP protocol. The latest version of the protocol – HTTP/3 – ditches TCP in favor of QUIC, which relies on UDP underneath. That makes the protocol much faster thanks to the lightweightness of UDP compared to TCP (which comes at the price of being much less reliable). According to various statistics, HTTP/3 accounts for about a quarter of the Internet traffic. HTTP/1.1 and HTTP/2 are still quite popular, so it definitely makes sense to have a look at the TCP protocol used underneath.
One of the characteristics of TCP is its 3-way handshake (that’s also one of the reasons why it’s so slow). Each new connection requires us to go through the procedure of establishing such a handshake, it’s no different in our scenario.
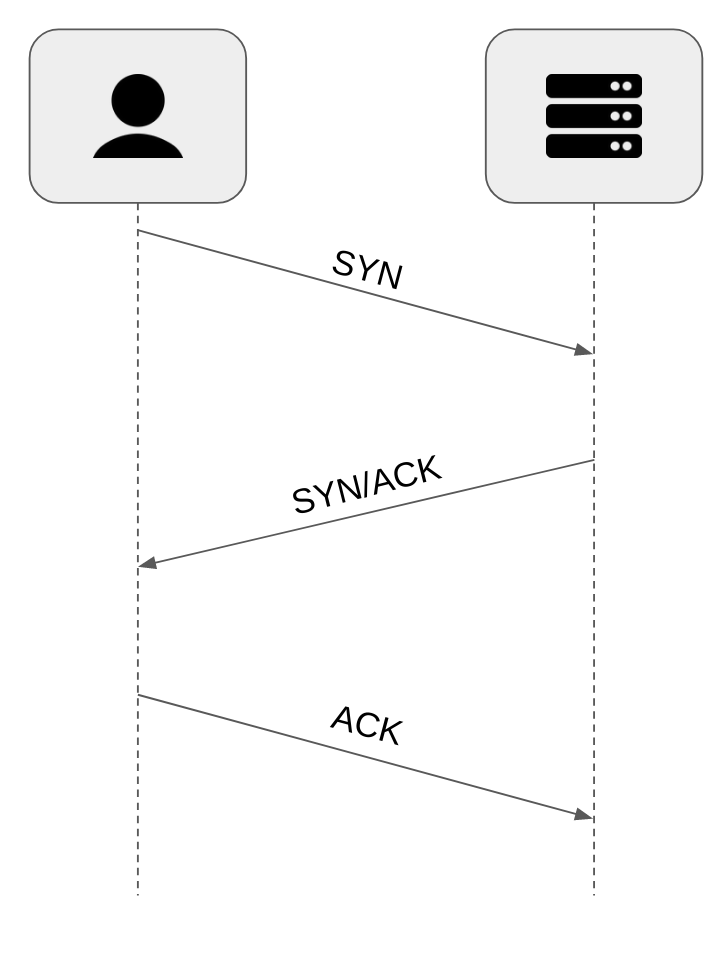
Having the IP address of esky.com, we can finally send the first actual message to it. This message would be the first step of the 3-way handshake (SYN). Here’s a simple visualization of the process that you have most likely seen in some form already, the “classic” TCP handshake:

Basically, the client (a web browser) sends the SYN message to initialize the TCP connection. The message contains various configurations that the client supports (like the maximum segment size). Then, the server would respond with SYN/ACK, which:
- Acknowledges client’s request
- Includes the server’s supported configuration (again, the maximum segment size is an example of such configuration)
In the end, the client sends ACK to finalize the handshake.
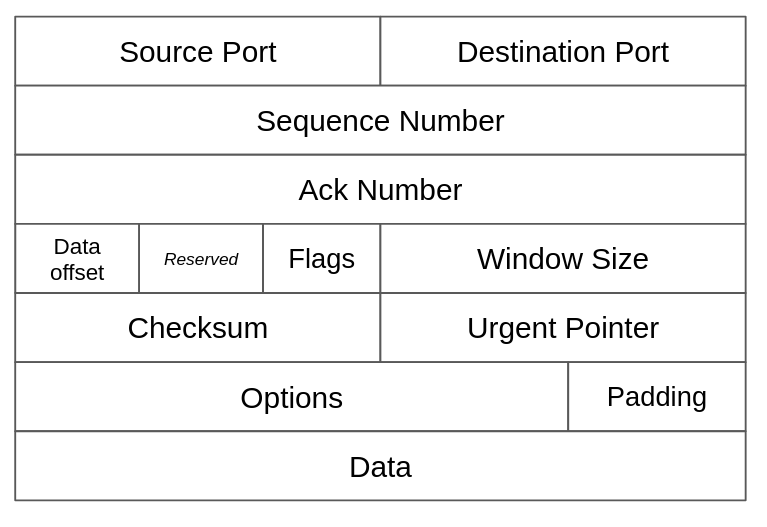
Note that the ACK and SYN keywords are just flags attached to the TCP-formatted segment. They might be either on or off.

The successful 3-way handshake results in sockets being established on the client and server sides. A socket is a pair of:
- IP address
- Port
The server’s port is usually 80 (for HTTP) or 443 (for HTTPS), while the client’s port is going to be selected randomly.
TLS
With the TCP connection established, we can move on in our journey. This time, we are going to look at TLS. Not every HTTP request is going to use TLS, since there are still lots of websites that do not utilize encryption. Their number is probably going to decrease in the future due to web browsers’ treatment of such sites – they are visually marked as insecure. esky.com rightfully utilizes HTTPS, so we are not going to skip TLS.
Note that many websites are available on both HTTP and HTTPS ports. When the client makes an HTTP request, most often they get redirected to the HTTPS alternative of the website. This is a potential security risk, since the initial HTTP request could be hijacked and a malicious HTTPS redirect could be returned. The (described already) predefined HSTS list provides a protection against it. The initial request would be an HTTPS one from the start.
Similarly, to TCP, TLS involves a handshake process. However, due to various versions of TLS being used nowadays, we can expect at least two variations of that handshake:
- TLS 1.2 – 4-way handshake (2 round trips)
- TLS 1.3 – 2-way handshake (1 round trip)
Additionally, various sites still use TLS 1.1 (or lower!), which might be a security risk. Depending on your browser, you might be warned before entering such a website.
esky.com uses TLS 1.3, which is the latest version of the TLS protocol. One of its benefits is an optimized handshake procedure. Here’s a short summary of the TLS 1.3’s 2-way handshake:
- The client sends Client Hello, which includes (among other data):
- Diffie-Hellman parameters
- Server Name Indication
- ALPN
- 0-RTT PSK
- The server responds with Server Hello, which includes:
- Diffie-Hellman parameters
- An X.509 certificate of the server
- ALPN
Let’s have a brief look at various things that were listed above.
Diffie-Hellman
TLS 1.3 uses The Diffie-Hellman method of generating asymmetric key pairs. At the same time, it drops support for RSA key exchanges. The key benefit of that move is Forward Secrecy. The private key of the asymmetric pair is never transmitted through the network to the other party, which was an issue with the legacy RSA algorithm.
In this blog post, we are not going to go through the math of the Diffie-Hellman algorithm (most likely, that’s not something that you are going to need as a web developer anyway). In summary, the client and the server exchange parameters that allow them both to generate the same private key without enabling any third party to generate that key.
The asymmetric key pair will be used just for one purpose – to send the symmetric key that will be used further on for future communications via the secure channel. Symmetric key operations are just faster than the asymmetric counterparts. It’s worth mentioning that the choice of symmetric key algorithm is also a part of TLS. The client and the server negotiate on the selection of such an algorithm.
Server Name Indication
One of the results of the TLS handshake is the receival of the X.509 certificate by the client. In simplest cases, we could assume that one server hosts just one website. In reality, it’s not the case. Some of the reasons are:
- IP addresses are quite valuable – each website having its own unique IP address would definitely speed up the IPv6 transition. Sharing IP addresses by multiple websites is probably one of the reasons why we’re still on IPv4.
- The server’s compute resources are realatively expensive – it makes sense to host multiple websites per server
The fact that an IP address does not correspond to a single domain name is problematic because the server needs to send us the X.509 certificate for the correct domain before we start the actual HTTP communication (we still didn’t send the first GET, which includes the domain name (host)!). This problem is solved by SNI (Server Name Indication). As part of the TLS handshake, the client sends the domain that it is trying to reach. This way, the server that terminates the TLS session is able to attach the proper certificate to the response. Note that TLS 1.3 enables an encrypted version of SNI, called ECH (Encrypted Client Hello). TLS 1.2 would actually leak out the domain name that the client wants to reach due to the usage of unencrypted SNI (a bit similarly to how DNS already leaks it).
ALPN
The next interesting piece that we are going to mention regarding the TLS handshake, is Application-Layer Protocol Negotiation (ALPN). This is the stage where application-level protocol (Layer 7 of the OSI Model) is selected. In our example, the client (web browser) is going to inform the server about the HTTP versions that it supports (during Client Hello). The server selects one of these options and informs the client about it (during Server Hello).
0-RTT
TLS 1.3 introduced a great improvement in latency by cutting in half the amount of required round trips. This can be optimized even further thanks to 0-RTT (zero round trip time). 0-RTT allows clients who have already established a TLS session before (which is not the case of our scenario, we’re making a first-ever HTTP request to the server), to resume that session without going through the handshake process again. If a given server supports 0-RTT, it will accept a PSK (pre-shared key) during the initial handshake. That key may be used later on to resume a session and send the request (like an HTTP request) directly. That request would be encrypted with PSK.
0-RTT decreases latency, but it comes at a cost of lower security compared to the full TLS 1.3 handshake. PSK is transferred between parties through the network, making it not forward secret.
As you can see, the TLS handshake is not just about encryption anymore. In order to optimize the communication between the client and the server, it was extended to cover more domains than just security.
The Actual HTTP Request
Our initial goal was to send an HTTP request. Finally, we got to the point where we can actually do that! Note that each of the steps we’ve taken so far is going to come useful in this final action:
- Our message will be addressed to the IP address that we resolved using DNS.
- The message will be sent via the TCP connection that we established with the target server.
- The message will be encrypted using a symmetric key that we received during the TLS handshake.
- The format of the HTTP message will be prepared according to the HTTP version selected during the ALPN stage of the TLS handshake.
- The authenticity of the response from the esky.com server will be validated using the server’s certificate which we acquired during the TLS handshake.

We’re not going to look in detail into the request itself right now. That might be a good topic to explore in further blog posts, especially considering the three most commonly found versions of HTTP in the wild – HTTP/1.1, HTTP/2, HTTP/3.
Summary
The goal of this article was to highlight the most important steps leading to an HTTP request. Hopefully, it gave you a nice overview of the process and allowed you to appreciate the abstractions handed to you by the tools or libraries that have to do all the hard work behind the scenes. Note that we really just scratched the surface, there’s a lot more going on in the lower layers of networking. Fortunately though, application engineers rarely have to go down there.

